18 October 2011

Installing Sun Java 6 on Ubuntu 11.10 - Oneiric Oclrot

There are two Java versions available one is OpenJDK and other is from Sun called Sun Java.
OpenJDK is supported by Ubuntu team and is directly available for download through Software Center.

OpenJDK works with most of applications offline or online, but some applications like Minecraft do not work on OpenJDK (well at least in case of me, it didn't). So here's how to download and install Sun Java 6 for Ubuntu 11.10 Oneiric Ocleot.

Step 1: Add an additional repository in your software sources list by 
sudo add-apt-repository "deb http://archive.canonical.com/ maverick partner"

Yes MAVERICK partner even if u have Oneiric running. This is because Canonical still didn't upload the sun-java6-jre and sun-java6-jdk packages to the Oneiric repos. You could later remove the Maverick repository.

Step 2: Update your sources list with 
sudo apt-get update

Step 3: Now install whichever package you want, either Java6-JRE which is Java Runtime Environment meant for just running Java apps or Java6-JDK - Java Development Kit meant for programming in Java by.
sudo apt-get install sun-java6-jre  (For Java6-JRE)
                                  OR
sudo apt-get install sun-java6-jdk (For Java6-JDK)
Accept all the license agreements from Java in terminal. 
If you aren't able to click the <OK> button, press TAB and enter.

This would install Java6 packages into your Ubuntu. 
You could even download and install Java from http://java.com. 

14 October 2011

Installing Google Chrome on Ubuntu 11.10 Oneiric Ocleot & 12.04 64-bit

Here's how to install Google Chrome (not chromium) in your brand new Ubuntu 11.10 Oneiric Ocleot.

Step 1: Download Google Chrome .deb from http://chrome.google.com and place it in your Downloads folder

Step 2: Install the three necessary packages for Google Chrome

In terminal type:  
sudo apt-get install libnspr4-0d libnss3-1d libxss1
Step 3: Now to Install Google Chrome type:
sudo dpkg -i ./Downloads/google-chrome-stable_current_amd64.deb
(Change the file name according to your downloaded .deb file)

Enjoy surfing on the fastest browser :)


29 September 2011

How To install Adobe Flash on Google Chrome - Ubuntu 11.10 - 64-bit

Hello there,
Here's a quick post involving instructions/steps for installing Adobe Flash Player in Google Chrome for Ubuntu 11.10 Oneiric Octeot. Google Chrome has inbuilt flash plugin now, but its only for 32-bit version of the browser, for 64-bit Google Chrome you must manually download and install flash into your Chrome.


Select Operating System  - Linux(64 bit)
and version Ubuntu(apt) or (tar.gz)

If you select apt your software center will automatically install Flash Player Plugin for Chrome
But in case if thats not working you can download tar.gz open it and follow the instructions as given below..

  • Extract the libflashplayer.so file on your desktop 

  • Now open your Terminal and type
sudo cp ./Desktop/libflashplayer.so /opt/google/chrome/plugins/
If the "plugins" folder is absent you can create it by
sudo mkdir /opt/google/chrome/plugins
Now restart the System, flash player should work now :)

22 August 2011

SA:MP Image2Textdraw Converter 0.1 Online

         Ever wondered if you could put images into your SA:MP server? What would you have to do for it? You already know many textdraw editors around which render text on your server, you would probably make hundreds of small textdraws and put them together to make your awesome server logo appear on the screen. But hey that isn't easy as it looks it would take you 40 years of hardwork and painstaking detailing. Absolutely you would put your server name instead and run to snatch your breakfast from the kitchen. So whats other option? tell your dog to do it, when u return after an hour you'll just see your computer keyboard in his stomach.


That's why I planned to make a simple Image to Textdraw Converter for SA:MP which just asks a picture from you and position where you would like to keep it. It features a drag and drop and shows your image preview on position selector which you can move with your mouse clicks. And yes it converts your image into a filterscript in just 1 second! I'm sure you take more time than this to bath everyday.. Next you have to copy the whole output and compile it in pawno, add the filterscript name to your server.cfg and it will load the image when you connect. And yes, its online. and therefore you don't need to download and store any software on your computer or keep searching it when u really want to convert a image, just bookmark the page or the home page and it will be there, waiting for you.

Features 
Superfast This app works superfast, however the speed is dependent on the machine you are using, on a normal PC you should get the output in 2-3 seconds. 


Drag and drop You can drag and drop images into the box and your image gets selected! But you can also select your file by browsing your hard drive (the ancient way!)


Transparency Detection It detects the pixels in your image which are transparent and skips them


No more 45x45 The 45x45 pixel limit is removed in this version which means you can upload larger images, the tool calculates the transparent and non-transparent pixels, if the number of non-transparent pixels is less than 2048 output is generated or else you get a message saying you should upload images with less number of non-transparent pixels. 


Position Selector You can select the position for your image just by clicking on the position selector, your selected image appears where you click.


Screen shots of converted Images


URL: http://bsndesign.webs.com/image2textdraw.htm

07 August 2011

Google +1 on Blog - Why is it so Important?

Google released the "Plus 1" button for webmasters and bloggers, so why is it so important to have one on your page? Google's new Plus button is also called social influence button by many, the more number of hits you get on your plus one button the more your chances are for getting more number of visitors. Plus One buttons basically shares your website link on your Google+ profile and recommends the links to your Google contacts and friends, these +1'd pages are given more priority when your friends or ones in your contacts searches relevant things but soon Google also started to count the number of +1's for your page rank. Google's Plus One should be given greater priority than the facebook's like and twitter button as it will decide your website's page ranking.
As this Google Webmaster Tools page clearly says


"Add the +1 button to let visitors recommend your site on Google"

How to add +1 button to any website?
  • First go to http://www.google.com/webmasters/+1/button/
  • Select necessary size and language 
  • Select and Paste the &lt;g:plusone&gt;&lt;/g:plusone&gt; to the place where you want you +1 to appear
  • Copy and paste the settings code after you finish adding all your +1's, preferably just before &lt;/body&gt;
How to add +1 button to my Blogger blog?
Blogger now features a set of share buttons which appear after every post automatically. It also includes a +1 button by default. If you don't see the new share bar,
  • Go to Design &gt; Click "edit" which is inside the main content area


  • Check "Show Share Buttons"


If you have moded template, these share buttons wont appear even after checking the box, ill write about showing Share Buttons in moded templates in my next post.

06 August 2011

Ubuntu File System - Explained

Here's a short overview for a complete beginner explaining everything about file system in Ubuntu and how to manage files and folders, hide them, see them from terminal, work with them etc in a Linux Ubuntu OS. For this guide I will use Ubuntu 10.10 which I think is the most successful Ubuntu release till date. This guide is aimed for users which are completely new and are unfamiliar with Ubuntu structure i.e Windows users.

Isn't it same as Windows?
Simple answer: yes and no!
The visual part here is quite similar to Windows. But Windows files are arranged inside drives. These drives are alphabetically named like C drive, E drive etc. (where mostly the system files are stored in your C drive) and you store all you files, photos and videos inside these directories. Well, its the same way in Ubuntu all the files are kept inside a single drive called "Filesystem" and no other drives, in case you can create one but its really unnecessary to do so. You can always store it in the basic Ubuntu files system.

First Some Basics
Lets first explore what we already have on a new Ubuntu machine.
Unlike you had My Computer in Windows, here you have to explore your files through the "Places" tab.
Lets take a closer look at the menu, your "Home Folder" is your main working folder, you can store all your music, images, videos or documents as well as you can see your downloaded files in Home Folder. All these pre-created folders are then listed below the Home Folder. By default the files you download with default browser Mozilla  Firefox are stored in Downloads folder. The "My Computer" in Windows is similar to "Computer" as you can see above, through which you can manage all your drives. You can see the Drive C and Drive E which are Windows drives because I am duel booting with Windows i.e I have Windows installed with Ubuntu on my computer and can access all my Windows files from here. Next there is Network which is for your LAN and the Connect to Server thingy is for FTP servers if you have any.

Try exploring each one of them and get familiar.
As you now know that you have Desktop, Documents, Music, Images, Videos etc inside your Home Folder lets find where this Home Folder is located. First open up your "Computer" in "Places" tab now you will discover a lot of files, all of these are Ubuntu's system files. Lets not fiddle with them for now. Just to learn where Home Folder comes from open the "Home" folder, it will have another folder with the name of your Username and there you will find your "Home Folder". These are the basic folders you must know.

The Complex Part - Using Terminal
Terminal is the place from where you can give commands to your Ubuntu, by default all the applications you use automatically give commands to the terminal and shows the result which saves your times for typing. But you can still learn to manually give commands to the shell which can always be useful.
You can open the basic terminal (don't do this now) by doing Ctrl + Alt + F3 and return back with Ctrl + Alt + F7 but there is also a terminal window by GNOME which can be opened by Applications > Accessories > Terminal.
On opening the terminal the first thing which you will see is a blank window with your username an @ symbol your computers name and a $ written - this $ means the terminal is ready to accept commands from you.
The default directory for terminal is your Home Folder, you can change this by using "cd" command

The "pwd" command
On opening the terminal the terminal has a working directory - now a working directory is the one which is used whenever you use a command like for opening a script, the terminal will search for that script in a directory which is called as working directory.
To see the current directory or working directory use the pwd command.



This shows my working directory is /home/bhavesh

The "ls" command
ls command lists all the current files and folders inside working directory


The "cd" command
cd stands for Change Directory, it is basically used to change the current working directory for terminal.
Now you know the folders and files inside your working directory. Now lets try to change our working directory by "cd ./Desktop" command.
You will get a ~/Desktop before your $ which means your current working directory is Desktop inside Home folder. You can check this my doing "ls" again.

Now What?
After reading this you now have a basic idea of how are files and folders arranged inside your Ubuntu FileSystem, you can learn more Shell Commands from here http://linuxcommand.org/lts0020.php < This website has all linux commands and explanation for file management.

04 August 2011

C++ in Ubuntu (gedit)

Hi there,
      If you are a C++ programmer or you learn C++ in your school/college and you programmed in Borland C or Turbo C earlier in Windows and thinking it would be so good if I could write my programs in Ubuntu, here's a cookie for you. Unlike downloading compilers and debuggers in Windows, there is an easy way to write and test C++ codes in Ubuntu. This includes using the pre-included text editor (gedit) and two small scripts with some standard libraries which we would download.

Things we will need:
  • Gedit
  • Two small scripts (Compile and Run)
  • Ubuntu Build-essential package
1) Gedit
gedit is the official text editor of the GNOME desktop environment.
While aiming at simplicity and ease of use, gedit is a powerful general purpose text editor.
We can create and add external plugins to this text editor easily.

 2)  Compile and Run scripts
I have two scripts with me which are supposed to be added into gedit, you can download them from here,


3) Build Essential package
You will need Build Essentials for Ubuntu if you want to program anything, even if you download NetBeans IDE or any such IDE you will always need build-essential which contains all the libraries needed for programming

Download Buil-essential package by typing this in terminal
sudo apt-get install build-essential

Procedure

Do..

cd ~
mkdir -p  ~/.gnome2/gedit/tools
nautilus ~/.gnome2/gedit/tool
s

Copy and Paste the two downloaded scripts inside this newly created folder

chmod +x ~/.gnome2/gedit/tools/*


Now make a new C++ file in gedit by right clicking on desktop > Create Document > Empty File and name it as any_file_name.cpp . In gedit open Preferences (Edit > Preferences) go to Plugins tab and enable External Plugins.

After enabling External tools you would be able to see External Tools menu Tools > External Tools
Now write a simple C++ program and try executing it.
The scripts also add some shortcut keys for compilation and running the program
Press F5 to compile, now click "Shell Output" once and hit F7, this would run your program in a new Terminal window.


Note: The programs you write are not exactly similar to the ones which you did in Turbo/Borland C++. You will have to make some changes..
Some of these changes include
1) Including .h extension to header file does not work try removing it and vice versa
for example: #include won't work, instead use #include
2) There is no conio.h header file to stop the screen from getting closed, you will have to use stdio.h and put getchar(); two times for pausing the screen
3) Always use "using namespace std; " after all your include files.

Always remember to save the file before compiling

Sample C++ program for Ubuntu


Please let me know if you have any problem installing or running the program :)

02 August 2011

SA:MP BSN Textdraw Editor 0.3 Online


This is a third release in the series of Textdraw Editor's developed by BSN Design, but this time the offline software which was only for windows operating system developed with Visual Studio 2008 has become online. So anyone with a browser and internet connection can use it on any OS. This version has some more amazing features which would surly make building textdraws for GTA SA:MP servers easy as a pie. No downloading, no installation, just go to the website, enter information in fields, select color, position and your textdraw code is ready.


Some of the features of BSN Textdraw Editor 0.3 Online:
  • New Position selector with textdraw Preview on it
  • Move textdraw with mouse click and arrow keys
  • Feature to create Box's for textdraws
  • New Color Picker
  • Change Position Selector background image 
After you click on position selector, you will instantly get the X and Y co-ordinates for your textdraw.
Once you click Generate Code and get the necessary textdraw code you can simply make changes in the information you entered above and click generate code again to get PAWN code of new textdraw just below it, which means you can create as many textdraws you want and finally copy and paste all the code at once.

Movement of textdraws with arrow keys works only on Google Chrome for now but mouse click works on all the browsers. Its easy to use because you don't have to start your server and SA:MP many times just open a website in any browser with JavaScript support.


31 July 2011

Moving Wordpress Blog to Blogger.com

This is a simple three step guide with illustrative images to completely move your Wordpress Blog to Blogger.com


Why Move?


        Wordpress.com and Blogger.com are two leading websites to create a free blog in minutes. But if you don't want to touch the code and earn money through Google Adsense from your Blog, the easiest way to do this is make a blog on Blogger.com. Blogger provides tools to edit your post easily and has tons of gadgets to add into your post as well as sidebar. You are free to add ads to your blog on Blogger whereas Wordpress.com has a lot of restrictions on this (It also takes your 50% revenue LOL). Wordpress.com does not allow adding any external codes, not even JavaScript! Well, that would suck if u are a bit into web development. Blogger has tools to customize the template and theme 100%, you can also add themes from other websites. So if you made a blog on Wordpress earlier, this guide will help you out to move :)


How to Move?


1. First we will export all our posts from Wordpress.com.
     i) Sign in into your Wordpress account, go to Dashboard
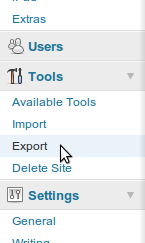
    ii) Browse to 'Tools' in left sidebar and Click 'Export'

  iii) In export window click 'Download Export File'

2. Now as you have your .xml export file on your computer,  go to http://wordpress2blogger.appspot.com/ . This tools converts the Wordpress export format to Blogger.
Upload your .xml file to this webpage and click convert


This will automatically download the converted version of original .xml file.

3. Now lets upload this to our Blogger blog
  i) Sign in into your Blogger account, go to 'Settings' and click 'Import Blog'


 ii) Choose your converted .xml file and click "Import Blog"
iii) Now you will see all the posts which were on your Wordpress, select them all and click Publish.

That's all, you've moved to Blogger.
Now if you want to delete your Wordpress account remember to download all your images and other media content and upload it to Blogger.
Free Domain Name Registration

14 July 2011

Running Windows apps on Ubuntu

Since you have now tried Ubuntu and now are getting used to it but you still miss some of your Windows apps which you used for years before but don't find them now on Ubuntu? "WINE" which stands for "Wine Is Not An Emulator" is an application for Debian distros which can run most of your Windows application on Ubuntu. This is a life saver and will allow you to completely shift to a new OS. But it does have a drawback i.e you cannot run "all" your apps with wine which you could on Windows. WINE has some limitations and has its own .dll files. It supports most of the applications and needs .dll files for some which don't. WINE has an "Application Database" which lists the currently supported applications by wine and also shows the ones which don't work.
To find out weather your app would work with WINE just Google your app name and add winedb in front of it. It will lead you to a page in wine's application database and you can find out what you need to do to get an app working.
To install wine just Open up your Ubuntu Software Center > enter WINE in its search box and install it.

Installing any Windows application with wine is quite simple, copy the desired .exe windows executable file to Ubuntu partition like your desktop right click on it > Permissions > check Allow Executing File as Program


Note that if you try to check Allow executing file as program option and it gets unchecked again it means your .exe file is not on Ubuntu partition.

There is also winecfg which stands for Wine Configuration Tool. With this tool you can select your desired screen resolution for a particular app or apply a new windows theme, change sound, video settings etc. winecfg can be opened by typing winecfg in terminal or Application > Wine.

05 July 2011

Visual Basic in Ubuntu (Gambas)

Hi there,

Most Windows developers when migrate to Ubuntu miss their hard practiced and well known Visual Basic or Visual Studio where they built apps with easy programming and GUI designing tools. There are many other similar Developing tools for Linux which are free and open source for developing apps on Ubuntu. But for those who don't want to go for a hard way to learn new things from the beginning and continue doing the well mastered way of creating apps, there is a tool called Gambas which I can say is exactly similar to Visual Studio. Gambas website says Gambas almost means Visual Basic but its not a replica, even the language used to develop apps is same.
So if you are a Windows developer developing apps on Windows and want so shift to Ubuntu but cannot because you probably don't want to learn another programming language and learn using a new SDK you will be surprised to see how efficiently Gambas works. You can app PictureBoxes, Text Labels, Color Picker and attach a code to any action performed.
To install Gambas on your Ubuntu simple open Ubuntu Software Center and enter Gambas in the top right search box, you will find a Gambas2 which is 2nd version of Gambas. Install it and launch it through Applications > Programming > Gambas.

There is a Release Candidate Gambas v3 on Gambas website http://gambas.sourceforge.net/en/main.html . But you will have to compile it yourself, rather if you are a newbe just install Gambas v2 from Ubuntu Software Center.


Above pic shows Gambas2 GUI designer.


Place to write code for the application which looks similar to one in Visual Basic 6.

01 July 2011

Creating Shortcuts for launching items

This is a short tutorial covering everything that will help you for adding shortcuts for your GNOME desktop.

This is a absolute Beginner tutorial and is explained in detail with screenshots.

Shortcuts are key combinations which when pressed perform certain tasks like opening an application or giving a particular command to the terminal. Adding shortcuts is quite easy in Ubuntu GNOME 2 as it has a pre-installed GUI application. This Shortcut application has all functions like adding a new shortcut, deleting or editing a current shortcut.

To launch Shortcut manager go to System > Preferences > Keyboard Shortcuts.

This windows shows currently assigned shortcuts list, it has name of shortcut on left and key bindings on right hand side.

To add a shortcut click Add


You can set your shortcut name and add a command to start an application.

Now you may not know what is the command for a particular application, this command can be known in many ways like you can try entering name of an application in terminal to check application command.
Like entering "winecfg" (without quotes) in terminal window opens up wine configuration window if you have wine installed.

The second way to do this to install htop and see the current running system process name, htop is a terminal application which shows the currently opened applications and can close them or perform some other task, htop is similar to "Task Manager" in windows.

To install htop do "sudo apt-get install htop" without quotes in terminal and launch it  by going to Application > System Tools > Htop.


As you can see in above screenshot there is a process named "htop" running which is a command for my Htop application. So I can launch Htop by typing "htop" in terminal.

So if I want to add a shortcut for running my Htop application I will first set its name (whichever I want) and a command to launch it.
Then you must a key binding for it by clicking on the key binding space on the right hand side and pressing a desired key combination.
Like if I press "Shift" and "S" while selecting the shortcut I could open my Htop whenever I press Shift and S together.
This makes using Ubuntu faster than ever :)

15 June 2011

Installing Java JRE and JDK + Netbeans

Short information and steps to install Java JRE and JDK with Netbeans.

On ubuntu you don't get Java preinstalled, lets first see what is Java.

Wikipedia says:
Java is a programming language originally developed by James Gosling at Sun Microsystems (which is now a subsidiary ofOracle Corporation) and released in 1995 as a core component of Sun Microsystems' Java platform. The language derives much of its syntax from C and C++ but has a simpler object model and fewer low-level facilities. Java applications are typically compiled to bytecode (class file) that can run on any Java Virtual Machine (JVM) regardless of computer architecture. Java is a general-purpose, concurrent, class-based, object-oriented language that is specifically designed to have as few implementation dependencies as possible. It is intended to let application developers "write once, run anywhere". Java is currently one of the most popular programming languages in use, and is widely used from application software to web applications.[9][10]
 

So Java softwares can be used anywhere windows, linux, mac, mobile phones and even your car. A ubuntu user would need Java JRE (Java Runtime Environment)  to run Java applications.

To install Java JRE on ubuntu 10.10

Open Applications > Ubuntu Software Center

Now there are two versions of Java available for Ubuntu, one from Sun Microsystems and other Open Java, Sun Java was dropped out and now Ubuntu supports Open Java.

Type "java6" without quotes in your Ubuntu Software Center search box and click "The Java(TM) Runtime Environment(JRE) 6 " > Install.


After installing Java JRE now you would be able to run Java applications.

Installing Java JDK + Netbeans

Java JDK (Java Development Kit) is only necessary if you want to develop Java applications with an external IDE like Netbeans or Eclipse. You can install Java JDK in two ways, one which comes with Netbeans and other in which you have to install Netbeans and Java JDK separately.

You can install Netbeans which comes with JDK directly from Sun Java website (http://www.oracle.com/technetwork/java/javase/downloads/index.html)

Alternatively you can also install Netbeans IDE and JDK separately.
First install JDK from Ubuntu Software Center, search "java6" in Ubuntu Software Center search box and install "Sun Java(TM) Development Kit (JDK) 6" then download Netbeans IDE from http://netbeans.com or again from ubuntu software center.

To install Netbeans downloaded from netbeans.com move your file to Home folder and type this in terminal

./name_of_your_file.sh

replace "name_of_your_file" with the name of file in your Home Folder.

This will install Netbeans IDE and Java JDK on your Ubuntu and you can now develop Java apps.

Remember that If you have OpenJDK installed first uninstall it and install Sun Java from Ubuntu software center, Netbeans wont detect OpenJDK.

23 April 2011

Data Manager (built with C++)

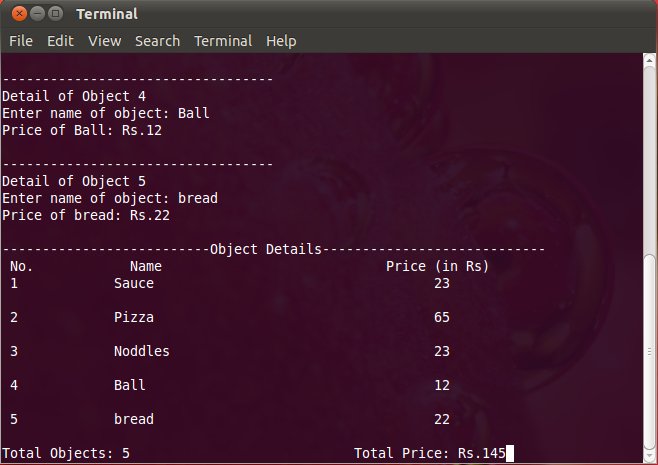
At your nearest supermarket did you notice a software that calculates the number of items you purchase and keeps a track of its price, name etc and prints a long list at last? I tried to make the same software with c++ which will ask user to enter item names and their prices and make a list of items with total price at last :) It does not have any GUI still but I think of adding one soon. This app is still in Alpha stage and you can suggest adding things to it and report bugs.

This app is built on Ubuntu 10.10 Meerkat Maverick using gedit. This app works only on ubuntu for now and always will.

Version: 1.0 Alpha 1

Date: 23/4/2011


Download

19 February 2011

Remote Professional - Cracked

Hello guys,

So here's a application for both pc and mobile called Remote Professional with which you can operate your mobile from PC. Its extremely useful in some cases, like making gdesk themes on a small mobile screen and operating those gdesk menus is a though job but with this app you can make the gdesk theme from your computer.

Basically it is provided by mobileways.de and its not free, a demo version is available which always shows a DEMO label on screen and closes in 4 minutes. No problem, we've got a cracked version here! Just download the file available below this post, extract all the items to a folder.

Now you have got 2 problems here, firstly this app doesn't work for windows 7 so you will have to change the compatibility settings to windows XP or vista. So if you are using windows 7 right click on the (.exe) app, click properties > Compatibility tab > and select windows XP. The second problem here is signing the app, the app wont install directly to your mobile, it will show up certificate error. So to solve this you need a OPDA certificate which you can get it from here. You have to provide them your IMEI and email, then download the .cer and .key files, put them into your phone, now download the freesigner app from here. Install free signer to your mobile, open it in setting select the "sign key and sign cer" > Add task > Go! and the app will sign your Remote Professional.

Remote Professional allows you to connect to Symbian s60 v5 devices through USB and bluetooth.

Thats all, enjoy fast typing and gaming on your mobile from your computer.

Download

15 February 2011

SA:MP BSN Textdraw Editor 0.2

Introduction


Textdraws are an essential part of any SA:MP server, no server would look attractive without a textdraw. You need to write codes in PAWNO to make textdraws. Certain textdraw creators are available on SA:MP forums but all of them work ingame. So I thought why not make a software which creates textdraws easily instead of going ingame again and again to create textdraws? So I started working on this project. This is the second release of this application. The best feature of current release is it supports click and get co-ords feature. It means that there is a SA:MP screen preview on which you just have to click to get screen coordinates. This data is automatically transfered in the form of PAWN code and presented and the end of textdraw creation process. Another important feature is color picker. This software supports a color picker which allows you to pick the color for your textdraw and background box directly from color picker (same as you had in paint). This then automatically converts the color into a hexadecimal value and enters it into the final code. A list of important features is given below.
  • Color Picker with Hex generator
  • Click and select screen coordinates
  • Easy to use and fast
  • You can create multiple textdraws simultaneously
  • Textdraw Preview


I searched SA:MP forums for available textdraw editors and all I found was a textdraw editor software made in 2009 with only radio buttons to select position. So I thought this would be a great replacement.

My next version will include textdraw preview on the position selector, and more easy to use interface. Please comment down reviews about the application and changes that you want me to make in future versions.

Download v0.2


Download

21 January 2011

Ubuntu :)

What you think which is the best operating system around? Windows 7, Mac? No its ubuntu :D


I downloaded the latest release of ubuntu i.e 10.10 three months ago (http://ubuntu.com), installed it and found it completely astounding. I was using windows xp earlier. Some of my friends said windows 7 is better than ubuntu, so I decided to give it a try, I got windows 7, it worked all fine but ultimately ubuntu took the cookie. Here are a few reasons.


1.Its the fastest.
I bet you, nothing's faster than this. It starts in 20 secs as compared windows 7 take 30 secs to start. It installs in five to ten minutes whereas windows 7 takes 20 to 30 minutes. Also ubuntu allows you to connect to your internet instantly as soon as you start your computer whereas windows take a longer time.

2.The finest
Ubuntu has an elegant look, soft corners and extremely customizable. You can even make it look like other operating systems like windows or mac with just a change of theme. There are a large range of themes available for ubuntu and they are easy to install.

3.It can run windows softwares.
Yes! your ubuntu can run windows software,  if you want to play games or apps  made for windows, you can. GTA- a very popular game and also NFS runs great with ubuntu. All you need is a software called wine.

4.Lots of apps.
Ubunu has thousands of softwares out there. It has a software center pre-installed , type whatever you want a select the software of your choice.  It has screenlets as you have a widgets bar on windows 7 and ofcourse lot more.

5.More than one desktop.
Ubuntu supports more than one desktops. You can have as many desktops as you want on your computer, it is really helpful when you are working with many applications and they don't fit in one single window. When you switch between these desktops you can apply your animations like 3D cube, which rotates and takes you to another desktop.


6.Help one click away.
If you are stuck anywhere with ubuntu, you can get help instantly. It has a large community and forum. It even has a IRC channel named #ubuntu where you can ask your questions and get answers from experts almost instantly.

7.Virus free.
Yea you no more have to worry about your files because virus's are impossible on ubuntu, you don't even need an antivirus. Read more here > https://help.ubuntu.com/community/Antivirus

So what else do you need? Download ubuntu.

Shobha Yatra 2024 - Gudi Padwa - Vasai Road | शोभा यात्रा २०२४ - गुढी पाडवा - वसई रोड

Vasai Road - Din Dayal Nagar Shobha Yatra 2024 on the ocassion of Gudi Padwa organized by Pandit Din Dayal Nagar Utsav Mandal and Rajadhiraj...