31 July 2011

Moving Wordpress Blog to Blogger.com

This is a simple three step guide with illustrative images to completely move your Wordpress Blog to Blogger.com


Why Move?


        Wordpress.com and Blogger.com are two leading websites to create a free blog in minutes. But if you don't want to touch the code and earn money through Google Adsense from your Blog, the easiest way to do this is make a blog on Blogger.com. Blogger provides tools to edit your post easily and has tons of gadgets to add into your post as well as sidebar. You are free to add ads to your blog on Blogger whereas Wordpress.com has a lot of restrictions on this (It also takes your 50% revenue LOL). Wordpress.com does not allow adding any external codes, not even JavaScript! Well, that would suck if u are a bit into web development. Blogger has tools to customize the template and theme 100%, you can also add themes from other websites. So if you made a blog on Wordpress earlier, this guide will help you out to move :)


How to Move?


1. First we will export all our posts from Wordpress.com.
     i) Sign in into your Wordpress account, go to Dashboard
    ii) Browse to 'Tools' in left sidebar and Click 'Export'
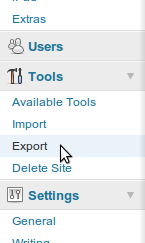
  iii) In export window click 'Download Export File'

2. Now as you have your .xml export file on your computer,  go to http://wordpress2blogger.appspot.com/ . This tools converts the Wordpress export format to Blogger.
Upload your .xml file to this webpage and click convert


This will automatically download the converted version of original .xml file.

3. Now lets upload this to our Blogger blog
  i) Sign in into your Blogger account, go to 'Settings' and click 'Import Blog'


 ii) Choose your converted .xml file and click "Import Blog"
iii) Now you will see all the posts which were on your Wordpress, select them all and click Publish.

That's all, you've moved to Blogger.
Now if you want to delete your Wordpress account remember to download all your images and other media content and upload it to Blogger.
Free Domain Name Registration

14 July 2011

Running Windows apps on Ubuntu

Since you have now tried Ubuntu and now are getting used to it but you still miss some of your Windows apps which you used for years before but don't find them now on Ubuntu? "WINE" which stands for "Wine Is Not An Emulator" is an application for Debian distros which can run most of your Windows application on Ubuntu. This is a life saver and will allow you to completely shift to a new OS. But it does have a drawback i.e you cannot run "all" your apps with wine which you could on Windows. WINE has some limitations and has its own .dll files. It supports most of the applications and needs .dll files for some which don't. WINE has an "Application Database" which lists the currently supported applications by wine and also shows the ones which don't work.
To find out weather your app would work with WINE just Google your app name and add winedb in front of it. It will lead you to a page in wine's application database and you can find out what you need to do to get an app working.
To install wine just Open up your Ubuntu Software Center > enter WINE in its search box and install it.

Installing any Windows application with wine is quite simple, copy the desired .exe windows executable file to Ubuntu partition like your desktop right click on it > Permissions > check Allow Executing File as Program


Note that if you try to check Allow executing file as program option and it gets unchecked again it means your .exe file is not on Ubuntu partition.

There is also winecfg which stands for Wine Configuration Tool. With this tool you can select your desired screen resolution for a particular app or apply a new windows theme, change sound, video settings etc. winecfg can be opened by typing winecfg in terminal or Application > Wine.

05 July 2011

Visual Basic in Ubuntu (Gambas)

Hi there,

Most Windows developers when migrate to Ubuntu miss their hard practiced and well known Visual Basic or Visual Studio where they built apps with easy programming and GUI designing tools. There are many other similar Developing tools for Linux which are free and open source for developing apps on Ubuntu. But for those who don't want to go for a hard way to learn new things from the beginning and continue doing the well mastered way of creating apps, there is a tool called Gambas which I can say is exactly similar to Visual Studio. Gambas website says Gambas almost means Visual Basic but its not a replica, even the language used to develop apps is same.
So if you are a Windows developer developing apps on Windows and want so shift to Ubuntu but cannot because you probably don't want to learn another programming language and learn using a new SDK you will be surprised to see how efficiently Gambas works. You can app PictureBoxes, Text Labels, Color Picker and attach a code to any action performed.
To install Gambas on your Ubuntu simple open Ubuntu Software Center and enter Gambas in the top right search box, you will find a Gambas2 which is 2nd version of Gambas. Install it and launch it through Applications > Programming > Gambas.

There is a Release Candidate Gambas v3 on Gambas website http://gambas.sourceforge.net/en/main.html . But you will have to compile it yourself, rather if you are a newbe just install Gambas v2 from Ubuntu Software Center.


Above pic shows Gambas2 GUI designer.


Place to write code for the application which looks similar to one in Visual Basic 6.

01 July 2011

Creating Shortcuts for launching items

This is a short tutorial covering everything that will help you for adding shortcuts for your GNOME desktop.

This is a absolute Beginner tutorial and is explained in detail with screenshots.

Shortcuts are key combinations which when pressed perform certain tasks like opening an application or giving a particular command to the terminal. Adding shortcuts is quite easy in Ubuntu GNOME 2 as it has a pre-installed GUI application. This Shortcut application has all functions like adding a new shortcut, deleting or editing a current shortcut.

To launch Shortcut manager go to System > Preferences > Keyboard Shortcuts.

This windows shows currently assigned shortcuts list, it has name of shortcut on left and key bindings on right hand side.

To add a shortcut click Add


You can set your shortcut name and add a command to start an application.

Now you may not know what is the command for a particular application, this command can be known in many ways like you can try entering name of an application in terminal to check application command.
Like entering "winecfg" (without quotes) in terminal window opens up wine configuration window if you have wine installed.

The second way to do this to install htop and see the current running system process name, htop is a terminal application which shows the currently opened applications and can close them or perform some other task, htop is similar to "Task Manager" in windows.

To install htop do "sudo apt-get install htop" without quotes in terminal and launch it  by going to Application > System Tools > Htop.


As you can see in above screenshot there is a process named "htop" running which is a command for my Htop application. So I can launch Htop by typing "htop" in terminal.

So if I want to add a shortcut for running my Htop application I will first set its name (whichever I want) and a command to launch it.
Then you must a key binding for it by clicking on the key binding space on the right hand side and pressing a desired key combination.
Like if I press "Shift" and "S" while selecting the shortcut I could open my Htop whenever I press Shift and S together.
This makes using Ubuntu faster than ever :)

Shobha Yatra 2024 - Gudi Padwa - Vasai Road | शोभा यात्रा २०२४ - गुढी पाडवा - वसई रोड

Vasai Road - Din Dayal Nagar Shobha Yatra 2024 on the ocassion of Gudi Padwa organized by Pandit Din Dayal Nagar Utsav Mandal and Rajadhiraj...